The third dimension in directional traction of an impacted tooth
Published: November 2011
Bulletin #5 - November 2011
The third dimension in directional traction of an impacted tooth
The labial archwire of a multibracketed orthodontic appliance provides us with the means of aligning teeth and, through its ligation into the individual orthodontic brackets, it also supplies much, most or all of the anchorage needed to achieve this. Certainly, we may need to add a headgear, intermaxillary elastics, a soldered palatal or lingual arch or a TAD (temporary anchorage device) or two from time to time but, by and large, the labial main arch ligated to orthodontic brackets is the principal source of anchorage. It may carry hooks or loops to which we may apply forces and it may also provide the point of application through which we may transfer these forces to a tooth or teeth in another location in the mouth. The labial archwire is a more or less ideal blueprint/exemplar of the final and desired form of the dental arch, when viewed from the occlusal aspect. We move teeth horizontally along it to create space to align other teeth which are displaced buccally or lingually from it. Moreover, malaligned erupted teeth are rarely more than a millimeter or two displaced in the vertical plane from the main archwire and, so, the crowns of the teeth are rearranged in accordance with the form of the labial archwire. This means that, for the overriding majority of individual orthodontic movements, a simplistic and essentially two-dimensional tooth-tipping approach to mechanotherapy is adequate to achieve the goals of the initial phase of most treatments, in what is called the “leveling-and-alignment” phase. In terms of the third dimension, any needed uprighting and torqueing movements of the roots of these teeth are performed thereafter, with the use of round and rectangular archwires or with auxiliary springs.
A three-dimensional approach is rarely needed in the leveling-and-alignment phase, unless an impacted ectopic tooth is present. For many cases with unerupted ectopic teeth, the direct path needed to resolve the impaction and place the tooth in its ideal final location is blocked by the presence of the root of an adjacent tooth. Nowhere is this more evident than with a palatally impacted canine, which has drifted mesial to the root of the lateral incisor. For the overwhelming majority of these canines, the root apex is in its ideal location, high in the line of the arch, while its long axis tips downwards, forwards and medially towards the midline. A lateral incisor root apex is typically more palatally located than the root apex of the central incisor and, as such, stands in the direct line between the crown of the canine and its intended place in the arch.1 Any attempt to apply traction to the canine, in a direct line to the labial archwire, will be opposed by the lateral incisor, which will prevent movement and may lead to the erroneous diagnosis of ankylosis. Alternatively, the resistance may not be sufficient to prevent movement, but the outcome could be resorption of the incisor root and/or a periodontal defect on its palatal aspect.2 To achieve full leveling-and-alignment of all the teeth in the maxilla in a single two-dimensional phase which includes this particular aberrant canine, is clearly impossible.
In general, the canine should initially be ignored and treatment concentrated only on leveling and aligning all the other teeth in the maxilla and the creation of space for the canine in its projected site (for exceptions to the rule, see Bulletin #3, September 2011 on this site). At the completion of this stage, a heavy, passive, stainless steel, main arch should be in place, to bind together a complete dental arch as an amalgamated anchorage unit. It should be clearly understood that loss of anchorage has been shown to be the most likely reason for failure in these cases.3 Attention may then return to the resolution of the impacted canine.
Before surgery to expose the tooth is undertaken, the orthodontist must be fully acquainted with its location in the three planes of space and its relationship to adjacent structures. In the present hypothetical instance, we have detailed its position above, but it should be obvious that appropriate radiographs and possibly a cone beam CT will need to be performed to provide this information.4,5 The orthodontist must then determine the manner in which traction should be applied to circumvent the impediment of the lateral incisor root. This involves building up a composite mental picture of the canine and its immediate environment vis-à-vis the roots of adjacent teeth, within the context of the anatomy of the anterior maxilla.
The strategy4 must be to first move the canine into a neutral position, from where the lateral incisor root is no longer in the direct path to the labial main arch. This may be achieved in two different ways. In the horizontal plane, an elastic tie may be drawn from the canine to the lingual cleat on the molar band of the same side or of the opposite side, depending on the direction that is needed to avoid a clash with the lateral incisor root. At the completion of this initial movement, the tooth is erupted but high in the vault of the palate and there is a height discrepancy between it and the main arch. Thus, if it is then drawn direct to the archwire, it may become re-buried in the lateral alveolar wall, where it may sometimes cause an acute lateral periodontal abscess.
For this reason, a vertical line of escape for the canine is usually to be preferred. In the vertical plane, the canine crown may be erupted downwards towards the tongue, clearing it from interference from the lateral incisor by creating a height differential. With the canine crown erupted to the occlusal level, moving the tooth in the direction of the main arch becomes routine.
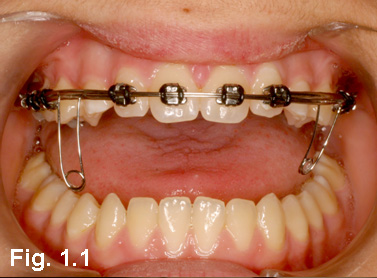
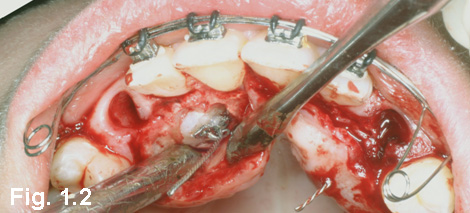
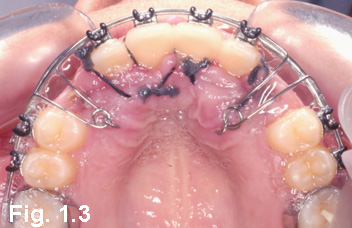
Case #1 bilateral maxillary palatal canine impaction
Fig. 1.1. A case of bilaterally impacted maxillary canines, following initial alignment and immediately prior to surgery, the auxiliary labial arch has bilateral vertical loops, is ligated in its passive mode and in piggy-back fashion over the heavy round main arch.
Fig. 1.2. The long vertical loops do not interfere with the surgeon’s access. Deciduous canines are removed and the most conveniently accessible crown surfaces minimally exposed on both canines. On the right side, the newly bonded (by the orthodontist!) eyelet may be seen with its steel twisted ligature hanging free under the flap. On the left side, the homologous twisted ligature has been deliberately pierced through the apposed flap at a point immediately opposite the bonded attachment on the tooth.
Fig. 1.3. A few days later, the patient has attended only to remove the sutures and to check that all is well. The vertical loops of the auxiliary labial archwire are seen in their activated mode, held lightly in position against the palatal mucosa on each side, by turning the twisted ligatures into hooks after passing them through terminal helices of the vertical loops - at the time of surgery. Note the presence of over-sized stainless steel tube threaded on to the main arch on each side and ligated between lateral incisor and first premolar, which is holding the increased canine space in the initial phase.
There are several techniques for achieving the vertical resolution of the palatally impacted canine and probably the most efficient and user-friendly device, is the auxiliary labial wire (Fig. 1.1).6 It does not require any special preparation, no additional attachments, no palatal arches, soldering or other laboratory procedures. The auxiliary wire may be simply fabricated chairside from a preformed archwire blank of round 0.016” hard stainless steel wire and ligated into the brackets in piggy-back style over or under the existing passive base arch and into one of the molar tubes. Although the archwire is ligated on the labial side, its vertical loop will be turned across the space in the arch that has been prepared for the canine and its terminal helix engaged in the canine attachment ligature at a carefully pre-determined point in the midpalate (Fig. 1.2, 1.3). It is from this point that the traction force will be directed to draw the tooth in a downward movement, and it is at this point in the palatal area that the tooth will erupt. Once erupted, the canine will have an uninterrupted and direct line to its place in the dental arch (Fig. 1.4-1.8).
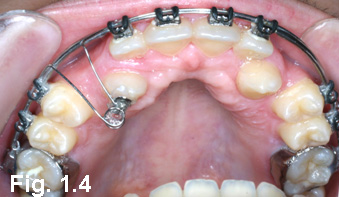
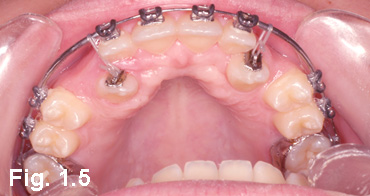
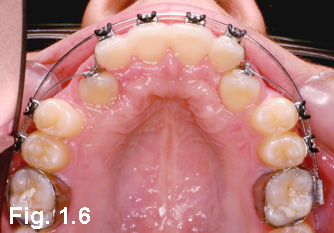
Fig. 1.4. Four months later, both canines have erupted through the palatal mucosa – although sometimes it is necessary to perform a simple “circumcision” if the very bulging canines do not make their own way through the tough mucosa.
Fig. 1.5. New eyelets are bonded to the mid-buccal aspect of the canines and initially drawn by elastic thread to the main archwires to improve the accessibility of the eyelets to a continuous labial arch. N.B. the steel tube canine space maintainers are still in place on the main arch and additionally act to maintain the archform against the pull on the canines.
Fig. 1.6. A month later, an auxiliary 0.012” Nickel-Titanium aligning wire is threaded through the eyelets, under the main arch. 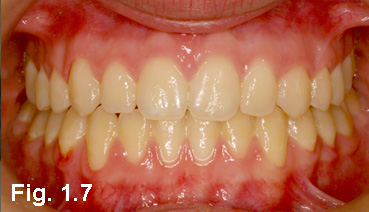
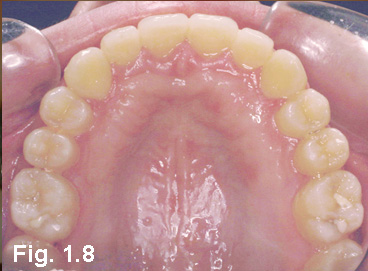
Fig. 1.7. In a follow-up 1 year post-treatment visit, the alignment and periodontal condition are good. The right canine shows normal clinical crown height. The gingiva around the left canine is still relatively low on the crown of the tooth. This is quite the reverse of what would normally be expected from a successfully treated impacted canine – they are usually easily recognized by receded gingival attachment and a long clinical crown!
Fig. 1.8. Contrary to instructions to wear the removable acrylic plate retainer at nights only, the patient has been wearing it full time with poor oral hygiene, with the result that the palatal gingivae are mildly inflamed and swollen. Nevertheless, the architecture of the gingivae and clinical crown height on the palatal side of the canines make them unrecognizable as having been previously impacted.
Case #2 Left maxillary labial canine impaction
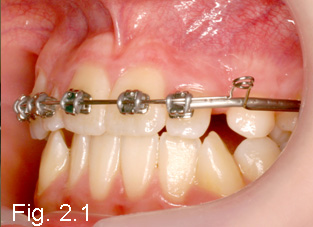
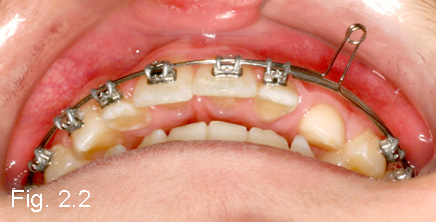
Fig. 2.1, 2.2. Lateral and occlusal views of the maxillary arches after initial alignment, showing an auxiliary labial arch ligated piggy-back over a heavy round main arch, in its horizontal passive mode. The space created by a coil spring is now maintained with an over-sized steel tube threaded on to the main arch.
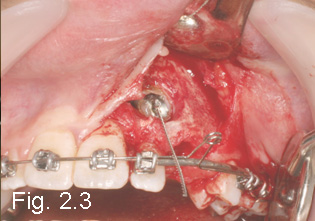
Fig. 2.3. At the time of surgery, the maxillary canine can be seen to be labial to the root of the lateral incisor and its unseen tip palatal to the root of the central incisor. An eyelet attachment is bonded on the accessible middle portion of the crown, with a twisted steel wire ligature hanging loosely from it. The deciduous canine has been extracted.
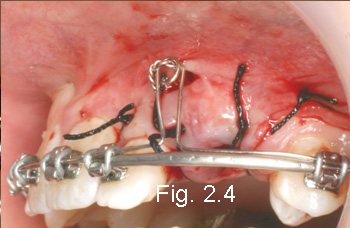
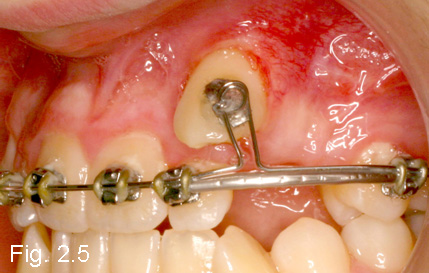
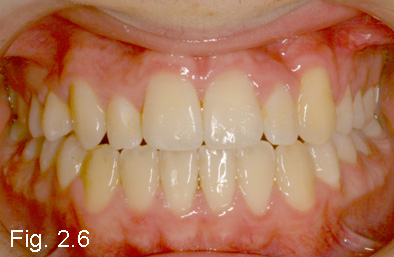
Fig. 2.4. The surgical field has been fully closed by complete flap replacement, the horizontal loop of the auxiliary labial arch is raised and ensnared by turning the twisted steel ligature around its terminal helix. Sutures were removed a week later.
Fig. 2.5. The patient returned by default only 6 weeks later, with the canine fully erupted through oral mucosa! While this shows the superior efficiency of the auxiliary labial arch and its long range of action, it would have been preferable to anticipate the tooth before it had broken through the thin mucosa of the sulcus area, to apically reposition the attached gingival on the crown of the tooth.
Fig. 2.6. The final result showing good torqueing alignment of the roots of the 3 anterior teeth of the left side, but the soft tissue support around the affected canine lacks attached gingiva.
The auxiliary labial arch is also a valuable asset for a tooth that needs to be brought down on the labial side of the arch (Fig. 2.1,2.2). A canine on the labial side of the lateral incisor is often very noticeable in the clinical examination as a palpable bulge overlying the incisor root. Unfortunately, with the crown of the impacted canine so close to the line of the arch, there is always the suspicion that it may be bearing down and obliquely resorbing root of the lateral and/or central incisor (Fig. 2.3). The exact relationship between the palatal surface of the crown of the canine and the resorbing front of the labial area of the root of an incisor can only be properly seen on a cone beam CT.
Similarly, a palatally impacted canine close to the line of the arch may have resorbed much of the root of the incisors from the palatal side and, as its eruptive development proceeds, it completely eliminates the apical third of the root, before it becomes palpably evident on the labial side!! This then forbids exposure and traction from the palatal side, since this would inevitably cause further root resorption.
A labial approach is necessary in both the above situations and traction must be applied from a point high in the labial sulcus, to take the canine further labially, in order to distance it from any contact with the incisor roots (Fig. 2.5). The auxiliary labial arch is particularly suitable for this very specific task. Only after it has been distanced from the neighboring roots should it be drawn distally and occlusally and into its place in the arch (Fig. 2.6).
References
1. Kokich VG. Surgical and orthodontic management of impacted maxillary canines. American Journal of Orthodontics and Dentofacial Orthodpedics, 2004;126:278-283
2. Woloshyn H, Årtun J, Kennedy DB, Joondeph DR. Pulpal and periodontal reactions to orthodontic alignment of palatally impacted canines. Angle Orthodontist, 1994;64:257–264.
3. Becker A, Chaushu G, Chaushu S. Analysis of failure in the treatment of impacted maxillary canines. American Journal of Orthodontics and Dentofacial Orthodpedics, 2010; 137:743-754
4. Becker A. The orthodontic treatment of impacted teeth. 2nd edition. Abingdon: Informa Healthcare Publishers. 2007. ISBN-13: 978 1 84184 475 6.
5. Becker A, Chaushu S, Casap-Caspi N. CBCT and the Orthosurgical Management of Impacted Teeth. Journal of the American Dental Association 2010;141(10 suppl):14S-18S
6. Kornhauser S, Abed Y, Harari D, Becker A. The resolution
of palatally impacted canines using palatal-occlusal force from a buccal
auxiliary. American Journal of Orthodontics and Dentofacial Orthopedic, 1996;110:528-534.


